As promised in my last post, here is a tutorial on how I like to face a quilt. Facing a quilt is a way to bind your quilt without having the binding show on the front. It allows you to take the quilting all the way to the edge, can add a nice professional and more artful looking finish, (especially to a smaller quilt) and I also find quilts seem to hang better and flatter with this method.

Please keep in mind that this is just one way to face a quilt, and that there are many different methods out there. A lot of quilters prefer to use methods that create mitered corners, and you can find loads of tutorials on how to do that with a goggle search. However, I am extremely direction challenged and found them a bit too confusing for me!
The method that I use doesn't give you mitered corners, but who cares as they wouldn't show on the front anyway. And best of all it is simple, straight forward and super-duper easy, I promise!
I broke this tutorial up into 17 steps, (all really simple so don't be intimidated) and lots of photos, as visually I learn best that way, and I am guessing you do, too!
So, here we go....

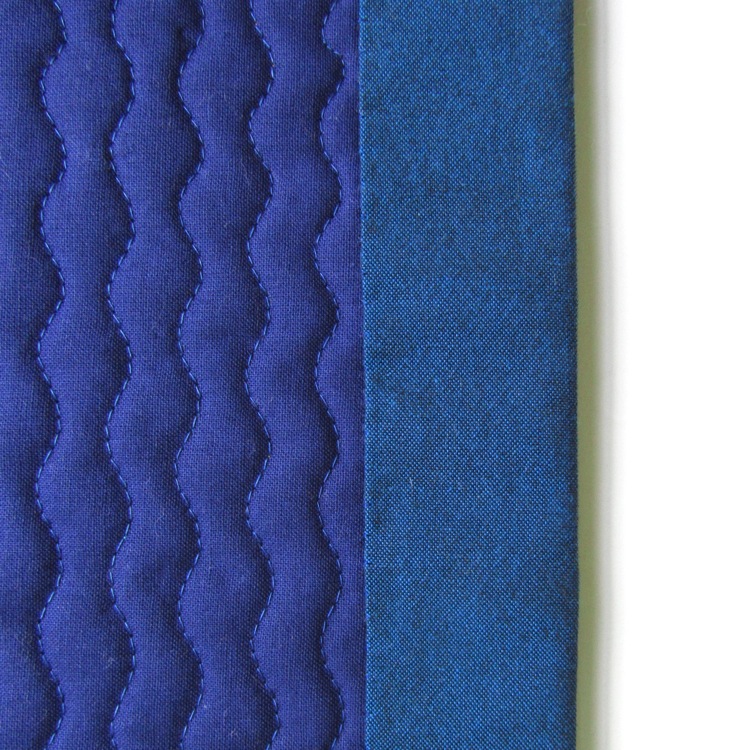
Step 1: Begin with a quilt top that you have finished quilting. Make sure to square the corners and trim off any excess batting and backing fabric. Starting at the top and the bottom edges of your quilt, cut two strips of fabric each 2" wide and a wee bit longer then your top and bottom edges. (Note: For photo purposes, my quilt is turned on its side here). With your quilt facing right side up, pin each strip along the top and bottom, lining the edge of the fabric strip to the edge of the quilt, as seen in the photo above. (Note: I like to use solids, but if you are using a print for your facing strips you would want to sew the strip right side down).

Step 2: Using a 1/4" seam allowance sew both strips in place and trim the excess fabric edges flush with the sides of the quilt, as shown in the photo above.

Step 3: Flip the strips up and over to the side, as shown above. (If using a print the print would now be face up). Press with a hot iron.

Step 4: Begin to fold the entire strip to the back of the quilt, as shown above. You almost have to roll the area that contains the seam allowance to get it to go backwards. As you are doing this, keep pressing with a hot iron, (I like to use a lot of steam, too).

The photo above shows what the front will look like once that strip is turned and pressed all the way to the back.

Here, the photo above shows how the edge of the quilt will look once the strip is folded back.

And this photo above, shows what the back will look like.

Very easy so far, yes?!
Okay, lets continue....

Step 5: Now you are going to flip your quilt over to the backside, and unfold those strips that I just had you so carefully fold and press! Using your hot iron and some steam, begin to turn and press the edge of each facing strip inward a generous 1/4" as shown above. (Be careful to just press the edge of the facing strip, and not that quilted seam allowance, as we want to keep the "memory" of the pressed fold there for later).

Step 6: Flip your quilt to the front and your facing strips, too, so they are now back to where you started. Pin in place so they lay nice and flat along the quilt top, as shown in the photo above.

Step 7: Cut two more facing strips, again each 2" wide, but this time approximately 1" shorter then the length of your quilt.

Step 8: Center each strip along the sides of your quilt leaving approximately 1/2" on the ends, as shown above. As before, pin both strips to the sides, lining up the edges of the strips to the edges of your quilt. Note: Once the new facing strips are pinned in place you can remove the pins from the first two strips.

Step 9: Begin stitching at the edge of the quilt, and using a 1/4"seam allowance, continue to stitch the length of the strip and past, going all the way to the other edge of your quilt. See photo above.

Step 10: Stitch each corner of your quilt. You will want to go right across that intersection, as shown above. This is to reinforce your corners for when they are turned. I like to stitch a line forward then another one backward, for extra strength.

Step 11: Trim each corner off, flush with the line you just stitched, as shown above.

Step 12: We are going to repeat a few steps here... As before in Step 3, flip the two strips that you just sewed over and away from the quilt and press. Then fold and roll the strips to the back as you did in Step 4 pressing as you go. Flip your quilt over to the back and unfold your facing strips as you did in Step 5 and press your generous 1/4" seam allowance along the edge of each facing strip.
But now, unlike before, I want you to re-fold and re-roll these two strips back again to the back of your quilt. Steam press again to get everything nice and flat.

The above photo shows what the front of your quilt should now look like. The facing strips along the top and the bottom of your quilt top are still visible on the front, and the side facing strips are turned and pressed neatly to the back.

And the photo above shows what that those two newest strips should look like on the back side.
Yup... lot's of little steps here, but they are oh, so easy! And we are almost finished!

Step 13: Flip your quilt to the backside, and pin those two strips flat against the back of your quilt, as shown above.
Step 14: Using nice small stitches, hand stitch each strip in place along the back of your quilt, as shown above, remembering to be careful not to stitch through to the front side.
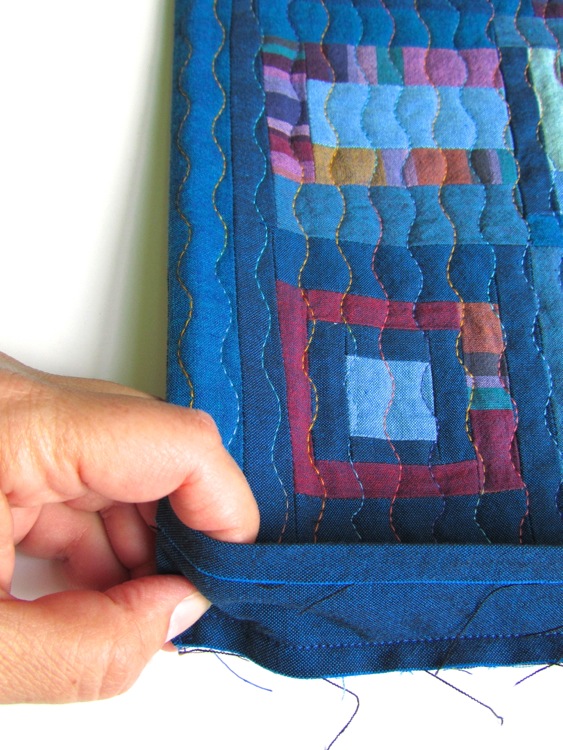
Step 15: We are in the home stretch now, baby! Using your forefinger and thumb, as shown above and below, push each corner right-side out. As you do this the two remaining facing strips on the front side of your quilt will naturally flip to the back of your quilt, where they belong.

Continue to push each corner out with your thumb. I then like to use a wooded chopstick to push the corner as far out as possible.

Step 16: Once the corners are all pushed out and the facing strips are on the backside of the quilt, re-press along the edges with a hot iron, making sure everything is nice and crisp and laying flat, as shown above.

Step 17: As before in Steps 13 and 14, pin and hand stitch the two facing strips down to the back of your quilt, as shown in the photo above.

Ta - da! That's it! You are all done!
Above, is what the quilt looks like from the back.

And here is what it looks like from the front.
Told you it was easy!
If you have any questions, ask them in the comment section and I'll do my best to answer them! xo
122 comments:
Excellent instructional tutorial. Thank you for sharing. I have never finished a quilt this way. I have done it where I stiched the back with batting to the front - right sides facing. Then turned it through a small opening left. I only have done it on small quilts. Actually quilted it after the back was stitched and turned. Your method probably works for large quilts as well. Will be trying it soon.
Quite possibly the best tutorial I've seen for ANYthing!! Wonderfully clear photos, and whilst I got a bit lost towards the end, I am reading this after midnight when I'm admittedly not at my brightest! Will definitely be using this for my next quilt - thank you so much! xx Are you happy for me to pin this?
Love this! Thank you so much!
QuiltingCyclist, Thanks and yes, it works on larger quilts, too! I think the method you describ trying is more of the "pillow case" method, which I have also done for small quilts, but I think this method gives better results.
Chloe Grice, Thank you! Sorry that you got a bit lost towards the end... probably where I start referring you back to previous steps and photos, which was easier to do on my end then adding even more photos! If you are still a bit lost after a good nights sleep, let me know where the confusion is and I will try to clear it up.
Virgínia, your welcome, glad you like it!
wow, thank you so much, what a fantastic tutorial. I'm so pinning it right now!
Yes, this is a fantastic tutorial, perfect finish for a great quilt, thanks for sharing!!
This is a great tutorial and I plan to save it for the future. One question I have is how did you keep your squiggly rows of quilting spaced so nicely and evenly? Thanks!
Thank you for sharing this, it is especially helpful to see how you handled the corners.
Thanks Svetlana, Alejandra, Linda and Leanne!
Linda, I start the first row of stitching by aligning the edge of my presser foot against either an outside straight edge of the quilt, or an inner straight seam line inside the quilt, (depending on where I start quilting). I follow that edge down as I stitch so I get a straight line. Then, I just align the edge of the presser foot against each previous line of stitch to form the next line of stitching. :)
This is brilliant - similar to how I do it, but I've never done the corners that way and I can see that they lay much nicer than mine! I'm going to try this next, thank you!
Intriguing! (and I love the quilt itself!). Is there a fairly straightforward way to incorporate some kind of hanging mechanism, e.g., Fast Finish Triangles?
Спасибо! Всё понятно и несложно.
Thank you! This is excellent and I can't wait to use it.
a very good tutorial and i do like the nice finished look of it when finished.
also LOVE the quilt in this post~!!!~
:-)
libbyQ
Absolutely lovely....I've gotta make a quilt now tom celebrate!
Absolutely lovely....I've gotta make a quilt now tom celebrate!
It does give a nice clean look doesn't it? Thanks for the tutorial!
Thank you for this really clear tutorial! I like the no-binding look very much, and the quilt in your post is beautiful.
Thanks, Victoria!
Love this tutorial! I have had a small zigzag quilt finished for awhile now but didn't really want to add a binding and cover all those small pebbles up. This will be perfect!
Here is a link to the quilt: http://jackiesquilting.blogspot.com/2012/05/mini-quilt.html
Thanks Victoria for your tutorial! I just used a similar method for a mini quilt made for a friend. I like the clean look the facing gives and highlights the quilting. Love all your beautiful quilts!!! Thanks for the inspiration.
Thank you so much for this great tutorial, I know I'm going to try it!
Great Instruction....thanks.
I would like to see how you do your triangular hanging piece.
Thanks for sharing!
Karin på Ösäter
http://karinpaosater.blogg.se/
Thanks everyone, glad to here it makes sense!
Recovering Perfectionist - With this method I don't use any short-cut, pre-stitched hanging-sleeve or corners, as they generally get stitched on before the binding/facing, and since the facing fabric is wider on the back then traditional binding, they would thus hang too low for a good display. Instead I recommend hand stitching a hanging sleeve on, (or corners if you prefer) after the facing is finished, positioning them about 1/4" to a 1/2" down from the top edge.
Thank you for the excellent tutorial! I also got a bit lost with the mitering part of facing a quilt and this avoids that altogether. I'm going to bookmark this for future reference!
This is a lot like the way I do it except I used a double fold of fabric for the binding. That way I can sew all four sides of the binding on with out stopping. I trim, flip, use lots of steam too.
Would be nice to see how you do your corner hanging pieces on the back of a small mini quilt.
Oh, I love that. Very cool.
In all my years of quilting - why is it that I never heard or seen this binding method!??? I love it!
Great tutorial and quilt! Now I have to try it.
Thank you for sharing!
Oh my goodness that does look easy.....now I'll have to give it a try. thanks so much for the great directions :0).
Happy Sewing
Aha! I'm nearing the end of the epic hand-quilting of a 2m x 2m quilt that I've had in progress for, umm... years... and I still haven't found the right shade of dark blue organic cotton fabric to bind it. But maybe I could just face it instead, and then the colour matters a little less. Thank you!
Fantastic tutorial! You are a great teacher. Your quilts are beautiful.
I can't wait to try this. I have a quilt that has been waiting for facing and I didn't know how to do it.
Thanks for this great tutorial!!
Thank you, Victoria! I finish my quilts the same way. But sometimes when the quilt is big some of the sides are "wavy" and the whole quilt is not so flat after hanging. Look at my last one.
http://3patchcrafts.blogspot.com/2012/07/quilted-wall-hanging.html
I have the same problem with the bottom side. I suppose that because quilting seams are perpendicular to this side. I have no problems with vertical sides.
What do you think?
Excellent tutorial. I do something similar but my facing or reverse binding is only a half inch wide when sewn down. I like how you turn the corners this way. I'll have to try it sometime - and reference it.
Thanks again, everyone - glad it's helpful.
Rumi, not sure what the trouble is on the larger quilts you are facing... the only things I can think of to help would be to make sure that when piecing the quilt you are following the grain as much as possible. Also, make sure everything is squared up before and after quilting, and definitely before adding the binding or the facing.
(Despite the waves, your quilt looks lovely!)
Oh Wow! I can't wait to try this. Excellant tutorial. Thank you so much.
I'm going to give this a try...the method I use has another line of stitching close to the 1/4 inch attachment seam to make it not curve to the front. thanks...I shared the link to this post on FB.
Karoda, Thanks so much for mentioning that. I have seen methods where an extra line of stitching is added, but forgot about it. I appreciate the reminder! So far I haven't hand any problem with the curving, but that is an excellent tip to remember, and might be especially helpful with larger quilts.
Lovely tutorial. I have pinned it to share with my friends and for reference on the very next piece I do.
I just followed your excellent instructions to face a 36" x 36" quilt...worked wonderfully! Thanks for all the pics
Kathi, Yay!
So happy to hear that!
Thank you for doing this great tutorial! I am going to try this one on my next small project. I really like the way it looks. Thanks again!
Yesterday i was sewing a placemat when half way through I realized that it would not look good with my usual way of binding. After that I stopped sewing and for the next hours circles around it wondering how to finish it off neatly and nicely. With my tea mug in my hand I visited the internet and came (as so often before) to your blog and what did my eyes see? There it was: the tutorial that helped me out! I read all though it, realized it was exactly what I was looking for and dashed back to my sewing room to finish off the placemat with your way of binding. It has turned out marvelously - it's just phantastic and the tutorial is so well written, I didn't stumble once! Thank you so very much, you have made my day, my week and my Christmas acutally because the placemats are to become a Christmas present! WOW! I am so thankful because I am so happy with the outcome. Thanks a million! Greetings from Germany
Kate, you are welcome. :)
Claudia, Thank you! You made my day!!
Thank you so much! I just finished your binding tutorial on one of my small art quilts and I am so pleased with the way it looks and feels.
It's all been said, but many thanks for the tutorial. Brilliant. I used your method today, when finishing off a small Indian applique quilt. Very clear instructions, and I am so delighted with the result. Previous efforts on this technique have been a bit 'iffy' to say the least!
Great binding tutorial with lovely close up photos. Thanks for sharing. Would like to link it from my blog. This is perfect for art quilts!
Fabulous tutorial, thank you!
Thank you so much for this tutorial! It was easy to understand and the pictures were very helpful. It came at the exact right time because I am making a quilt based on a Navajo rug my grandmother wove and Navajo rugs are woven right up to the edges! I want my quilt to look that way too. Excellent!
Best tutorial ever, Victoria. I used this for my latest quilt and love it. I doubt I will ever go back to bias binding and mitered corners.
Thanks a bunch.
blessings, jill
Just did it! It is not only easy, but beautiful to look at.
Thank you from Italy!!!!
Awesome! Just read this tutorial and can't wait to use it on my baby quilts and placemats. Thank you so much! The pictures were great!
This is brilliant and I actually "get it!"! Laura
Thanks so much for this tutorial! I just tried it on my practice piece and it works perfectly! I was looking for a way to reduce all that bulk in the corners and this method really fit the bill. Thanks for sharing this tutorial. I've pinned it and plan to share it wi th my quilt guild friends!
Thank you for sharing this - I have tried a "frameless" binding but this method is so much neater than mine was.
I never think of doing this, but it is great on your example and I'm sure it would be on many quilts. Thank you.
Thanks for this tute, I'm a confused lefthander with mitring issues and you have just given me the best way to bind runners without all the bulk of traditional binding.thanks from Australia xxxx
Thank you that was a great tutorial! Just what I needed to finish off my wall hanging!
Thank you so much for this tutorial! I'm going to use your techniques to finish up the quilt that I'm working on :)
Better to have found your blog and tutorial late rather than never. Thanks for sharing this easy tutorial on a new to me method of binding.
You have made this look very easy! I will definitely give it a try! Thanks so much for sharing!!
Your method is fabulous and simpler than any others that I have read. I am trying it today on an art quilt...I thank you for the clarity.
I am so happy to hear that this tutorial has been, and continues to be, helpful! Thank you everyone for your kind comments!
Your tutorial was so clear and easy to understand. Thank you. Is the facing fabric cut on the length (along the selvage) or width (from selvage to selvage) or does it matter? What weight and type thread is used on your quilting? I am finishing a baby quilt and it seems to need prominent embellishing. I am a novice in the thread department. Thanks again.
I'm glad that you found the tutorial helpful! I always cut the fabric on the grain, but it really doesn't matter if it's cut on the length or the width. The thread used on the quilt in this tutorial, was a 12wt cotton thread, from Sulky. I like to use a topstitch needle when machine quilting with heavier threads, and I always slightly elongate my stitch length, as I find the quilting comes out better. Good luck!
I just finished the top of a quilt and was debating on how to do the binding. As I did not have a clear idea, I let it rest for a while and went to take a nap and read a little bit. Then, pop!, there it was, NO binding. I knew you had this tutorial here, so I came to your place quick and fast and found it. So, this quilt of mine will be faced.
Thank you for your help.
Hi, I would love to know what thread you used to quilt this blue quilt - I love the thickness of it and how it stands out so well. Thanks. Pat
Thanks for the tutorial. I'm a newbie to this type of binding, but the clear photos and hand holding you did helped me get the job done without incident.
Angela, yay! And you are very welcome! (sorry for the late reply!)
Hi Pat, Thanks! I used 12 wt. Cotton Sulky Blendables Thread on the quilt. Also, when machine quilting, I always set my stitch length a bit longer then the machine's default setting, As I think the stitching looks nicer. :)
Afton, You are most welcome! So happy to hear it went well!
Thank you for a wonderfully clear tutorial! I've now made two quilts with your binding method, and both turned out great! I received a third-place in a regional show on one, and the other was chosen to travel with the Hoffman challenge quilts this year. I plan to use this for most of my wall quilts.
Oh my goodness, Robin, that is wonderful! Congratulations!! I am delighted that you found the tutorial helpful, and truly appreciate you sharing this good news with me!
Awesome! thanks for the really clear instructions
The link to your tutorial is very timely. I was trying to figure out how to bind a quilt without the binding showing and the only way I knew how to do it is by sewing the wrong sides together and reversing it. I have already begun quilting and its too late for that. Any way to make a long story short thank you, this is so timely.
This is the most clearly written and well-documented How-to on facing a quilt. I keep it on my computer and refer to it every time. Thank you so much for your generosity in sharing this method. Your photographs are great!
Benta, Rachel, and FoulkeArt, you are each so very welcome! I am delighted that it has been helpful to you all!
Thank you for the great tutorial. I just found it today and will defenitely use it.
Groetjes
Annemieke
Thank you - this is awesome! I love the look of quilting going right to the edge, and you've found a perfect way to finish it.
This looks great, and I can't wait to try it! So flat and smooth, love the look. Definitely want to try it on my next wall quilt. Didn't hurt that I also LOVED your little quilt itself~
Ok this is pretty great. I will have to try this out.
What a great tutorial! This is just what I was looking for. I have one question. How would you incorporate a rod pocket for hanging the quilt using this facing method? Thanks!
Excellent tutorial! I hadn't done a facing in a while and was looking for something clear and succinct. I took my iPad to my studio and got it done pretty quickly and with good results. Thanks!
One tip: I found using my quilting gloves with the slightly sticky fingers a great tool when rolling over the facing. They made it easy to hang on to the fabric while rolling and ironing.
Lovely tutorial, thank you. I think facing a quilt does give a contemporary look to a quilt. We added a blog post about How to Face a quilt (non mitred).
Brilliant, great tutorial I have 2 quilts where a binding might be taking away from the design...so I was looking for ' just the right color or pattern und checking color combos online and fate took me to your blog ...it is midnight but tomorrow I will do this. Many thanks!!!
Very happy to hear that this tutorial is still helping, thanks everyone for the comments!
And Margaret, great idea! I will definitely try that next time, thanks for sharing!
Your technique was just what I needed!!!Now I put a wrinkle in I needed a hanging sleeve so I added a wide enough folded hemmed strip on the top side of my quilt. The raw edges along the quilt just like yours but on the back side. The strip has to be wide enough so once you turn and stich down the other enough of the sleeve shows. Also when you stich everything down on the back you have to go really slow and feel your way through the quilt sandwich the needle has to go deep enough to catch binding, sleeve and back fabric and batting but not the front. It works great. Thanks again ,your posting is great and my little mug rug that I did in a trial run looks very sleek, and the first bigger one is half done.
Thanks for sharing your additional twist to this, great idea!
Bavarian....I also need to make a sleeve. I think I understand your method but not totally clear. I would love to see a picture of the back of the top of your wall hanging if that is possible. Thanks!
Victoria.... Thank you so much for this tutorial. I had never heard of facing a quilt before until someone on the Quilters Board posted a link to your method. I've got it bookmarked and can't wait to try it.
PghPat, so very happy that you found the link, and hope you enjoy this method. As for hanging sleeves, while Barvarian seems to have found a nifty method that works well for her and was kind enough to share it here, I generally just use the traditional method of making a hanging sleeve, and sew it on the same way that I would with a traditionally bound quilt. Whatever method works and is the easiest to follow is the way to go in my book!
I followed your instructions, has been perfect. Thanks
This tutorial is excellent! I have a quilt all quilted and ready to add the facing, but I was a bit unclear on the methodology. A friend explained her way, which is similar to yours, but I love how you have so many pictures. especially how you handle the corners. I'm going to do mine right now! Thanks!
Montse and Chris, very happy that the tutorial has been helpful to you both. Thanks so much for sharing!
(And Chris... being a visual person, I must, must, must have clear pictures to understand something... glad you found them useful as well!)
Love the idea of a facing as I am preparing several small wall hangings for our local show. My question is why are the facing pieces so wide? Will the quilt hang as well with a narrower facing?
I am doing a small quilt and want it to be a specific size. Do I cut the quilt ½" larger than the size I want it to be.
This is a great tutorial! Your instructions are clear and the photos are perfect! Thank you!
Great facing tutorial. I haven't read all of the numerous comments to see if anyone else has the same question. Do you have any suggestions about adding a hanging sleeve?
Hi Nancy, Jill and Suzss. I'll try to answer your questions one at a time...
Nancy great question! Generally a facing binding is wider then a traditional binding so that the turned edge is smoother and lies flatter. If it were more narrow, (as on the backside of a traditionally bound quilt) then it can be a little more difficult to get a good clean turned edge, (that extra fabric helps you to fold things in more precisely). I also find the extra fabric helps to "support" the overall piece, giving the facing a more flat, professional and clean look when hung). I have seen directions for strips up to 2.5" and as thin as 1.25".... so feel free to experiment!
Jill, Ohhh... math... you are making me think hard here! To my brain, yes, you would want to cut your finished, (pre-faced) quilt 1/2" bigger then you want your finished size to be, as you will be folding your faced edges 1/4" to the backside. Another great question!
Suzss, for a hanging sleeve, I simply make one as I would for a traditional quilt and I leave about a 1" section of "slack" along the top edge which I would place about 1" down from the top of my quilt while sewing the upper portion of the sleeve just under the stitched edge of the facing. Wow... that sounds super confusing... I think this deserves a quick post of it's own. No time now, but will try to post about this in a day or too with photos to help explain. Thanks for yet another great question!
Ok, as promised I just did a blog post about a hanging sleeve on a faced quilt: http://thesillyboodilly.blogspot.com/2016/05/inconsistent-suggestions-for-making.html
I think I've said this before but I always search for and refer to this tutorial when I do a mini quilt for a swap or a friend. I strongly believe in facing mini quilts so it doesn't detract from the design in a small quilt. Thanks so much for the work you put into this. I always tell my friends about this tutorial when I use it to finish a mini.
I think I've said this before but I always search for and refer to this tutorial when I do a mini quilt for a swap or a friend. I strongly believe in facing mini quilts so it doesn't detract from the design in a small quilt. Thanks so much for the work you put into this. I always tell my friends about this tutorial when I use it to finish a mini.
I was grateful to find this tutorial is still available. I was tempted to print it out, when I used your method a couple years ago, but the "color printer ink police" in the household asked me not to. Your instructions are so clear, even I couldn't go wrong. And thanks for the tips on hanging sleeves, too.
I wanted to say exactly what "Excited Grandma" recently shared. Thank you so much for this gift that keeps on giving!
Thank you so much, Anna V., Excited Grandma and Liz... I so very much appreciate your kind words. Warms my heart and lifts my spirits to know that I've been a small help in some way! xo
Hello Victoria, I have to thank you for this wonderful tutorial. I have been quilting for several years and hadn't heard of this way of finishing a quilt. I just followed your tutorial exactly and put a facing on a small wall hanging. I am just delighted with the way it turned out. Thank you again for your perfect wording and photos.
This looks great. It would be nice on larger modern quilts too so the design would go all the way to the quilt edge.
One idea to make sure the facing rolls to the back nicely is to employ an edge stitching technique from dressmaking. Extend the stitched on facing out flat and sew a line of stitching close to the seam edge (on the facing). That will make the facing roll to the back side of the quilt better and does not show on the front. You can do the same thing on the two end facings but won't be able to stitch all the way to the corners. It will still help the facings roll to the back better.
Thanks again. This is a great method.
I love your quilt and will use this technique on a larger quilt.
Thank you.
so good that a link to this was shared on a blog I follow today will definately use this for my crazy quilt thanks and a fewa other things I have plans for
Thank you, thank you, thank you!!! I kept seeing these quilts finished this way, and couldn't for the life of me figure out how it was done. I've done search after search on YouTube and other places, and couldn't find the right tutorial. Until now. This is great. Thank you for sharing this wonderful technique!
thank you for this great, straightforward tutorial! i am facing a mini quilt for a swap and this is perfect. :)
I just found your wonderful tutorial on quilt facings. It turned out beautifully and I'm planning on using it in the future instead of the "pillow case" method which I had used previously. Thank you for this easy to follow tutorial!
Thank you, Judi and to all the others that were so kind to leave a comment. I am sorry that I have been remiss in thanking many of you. I often don't see the comments to these older posts unless I remember to check. Please know, (despite my sometimes long periods of silence) how very much I appreciate everyones feedback, and I am so happy to know that this tutorial has been helpful to so many of you!
I like this tutorial. Is it possible to make the facing more narrow???maybe 1 1/2" strips?
Sherrill
Thank you so much! Today I asked my frienddship group what color I should bind my Dance of the Dragonflys with. Several suggested I should not bind it but I should face it as it is a wall hanging. So when I came home I looked at several untube videos about facing but knew I hit pay dirt when I came upon your wonderfully detailed directions. I now have one very beautifully faced wall hanging to give my very special sister-in-law.
Mignonne Cummings
Fiber Creations and Marti, sorry to you both for the late replies... I forget to check the comments as often as I should and miss notifications routinely...
Fiber Creations, the best way to know is to try it! maybe you could also try turning under the raw edge more then 1/4"... maybe try turning it in 1/2". Play around with it until you find the look that suits you best!
Marti, so happy that you came across my tutorial and found it did the trick for you! Thanks so much for letting me know!!
Thank you for this excellent tutorial. This method is new to me and I hope to try it soon ... :-) Pat
This is a great tutorial. It was the first time that I have faced a quilt and it turned out perfect. Your directions and photos were on target--easy to understand and to follow. I highly recommend using this technique.
July 25, 2018
Hi again!!! Twice in one day I find you on the internet!! Thank you this worked great!
Hugs,
Sue
Thanks so much for this great tutorial. I just used it to finish off a wall hanging, and it worked perfectly. And it was easy to follow and execute!
An excellent tutorial! Having more steps and great photos is better than fewer. I did make some changes though. I cut my strips to 1.5" instead of 2". Before sewing on, I drew a line 1/2" up and then folded / pressed the 1/4" fold. Also, I found that I did not need to press in place on the back. When it was time, I folded over the strip+quilt front, and then clipped (not pinned) it in place.
See my quilt blog: http://waynesquilts.blogspot.com/
Post a Comment